

July 4, 2025, 9:03 am | Read time: 2 minutes
Snails are a nightmare for gardeners. Not only do they leave a slimy trail everywhere, but they also devour painstakingly nurtured young plants. They have a particular fondness for lettuce and cucumbers. myHOMEBOOK gardening expert Franka Kruse-Gering explains how to easily and, most importantly, cheaply make a snail collar.
It’s frustrating: As soon as it rains a little, slugs come and eat my seedlings. There must be something to keep them away without harming them. Below, I explain how to make a snail collar yourself. It doesn’t offer 100 percent protection, but it’s better than doing nothing.
What Is a Snail Collar?
A snail collar is a simple garden device designed to protect individual plants from snails and slugs. Snails, especially, enjoy eating young vegetable plants like lettuce, cabbage, or squash. If these plants aren’t protected, they can be severely damaged or completely eaten in a short time.
The collar consists of a ring-shaped piece of plastic or metal that you stick into the ground around the plant. The edge of the collar is bent outward. This special shape prevents snails from crawling over it because they slip off or can’t overcome the edge. This keeps the plants inside the ring unharmed.
The snail collar is a natural, non-toxic method of snail control. You don’t need chemical agents like pellets, and you can reuse the collar multiple times. Especially in spring, when many snails are active and young plants are still small and delicate, the snail collar is a helpful protection. At this time, you can find it in many hardware and garden centers. However, you can also easily make it yourself at a low cost.
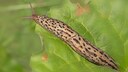
Tigerschnegel: Why This Slug Is Good for Your Garden

What Really Helps Against Slugs in Raised Beds?
What You Need to Make a Snail Collar
- A large yogurt cup
- A utility knife
Here’s How
Making a snail collar is very simple, but you shouldn’t be careless, as there’s a risk of injury if you’re not careful. You can discard the lid of the yogurt cup; you only need the cup and the utility knife.
Use the utility knife to cut out the bottom of the cup. And that’s it: The collar is ready for use in the garden bed.
It’s especially suitable for seedlings. If the plants are only a few days old, you need to carefully place them inside the cup or tie them up.