


July 22, 2024, 12:41 pm | Read time: 5 minutes
Some garden tools are increasingly fading into the background, eventually becoming forgotten. Yet, when these tools were invented, people put a lot of thought into them. As a result, these old tools are quite useful. This is true, for example, of the so-called Olla. It’s a sophisticated irrigation system that can still ease the workload for today’s gardeners.
In summer, watering plants in the garden becomes a primary task for gardeners. To avoid lugging watering cans, many invest in irrigation systems. For those who prefer a simpler method, an old garden irrigation system is an option: the Olla. This is a clay pot. Olla is Spanish and means “pot.” This ancient irrigation technique is particularly practical because it saves money, makes life difficult for snails, and keeps plants watered even during vacations. With just a few materials, you can also build an Olla yourself.
How Ollas Work
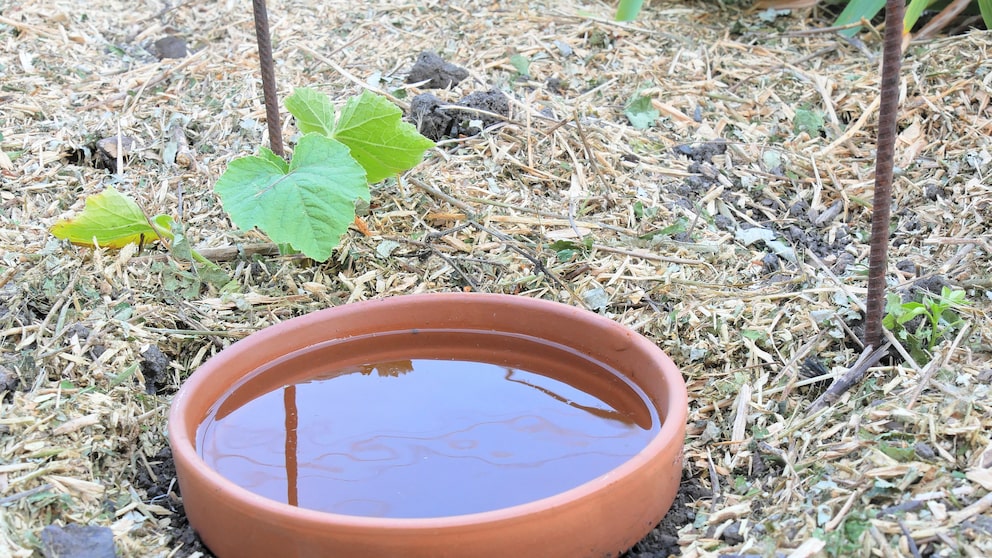
Ollas, whether purchased or homemade, operate on a simple principle. They are buried in the ground so that only a small, upper portion protrudes from the soil. The Olla can be filled through the drainage hole. The water doesn’t rush into the soil all at once but gradually seeps in. This is due to the microporous structure of the clay. If the soil around the Olla is dry, the water is slowly released through the pores. When the soil is sufficiently moist, the release process is significantly slowed. Depending on the size of the Ollas, plants within a radius of 50 to 100 centimeters can be adequately watered.
Tip: Raised beds or plant containers can also be watered using Ollas.
Advantages of Ollas
Two advantages of watering with Ollas are obvious: The first is the time saved by using Ollas. Instead of reaching for the watering can daily, you only need to refill the pots occasionally. The second advantage is financial. The material costs for building an Olla are low, while the water savings are significant. They can be up to 70 percent.
Another advantage is that the water is not poured onto the soil but released into the ground. This encourages plants to develop roots deeper in the soil. Additionally, weeds find it harder to germinate on a dry soil surface, and fungal diseases and some pests, such as snails, have a tougher time.
Disadvantages of Ollas
Despite all the advantages, there are a few disadvantages. The Olla must be buried in the bed and regularly checked for holes and water levels. Additionally, it must be dug up in the fall to ensure frost-free overwintering. Young plants and seedlings cannot be adequately watered with an Olla. Here, the watering can must assist.
Also interesting: How to Water Plants with the Bottle Trick
Protect Plants from Waterlogging with Effective Drainage

How to Water Plants Using the Bottle Trick
Building Ollas Yourself – Step by Step
Building Ollas yourself is easy and quick. Most materials are already available in many gardeners’ households. The rest can be purchased inexpensively.
Materials
- Two clay pots with similar diameters. It is essential to use unglazed clay pots, as otherwise, water permeability is not ensured.
- Adhesive such as wax, tile adhesive, quick-setting cement, silicone. The most environmentally friendly adhesive option is simple beeswax. All other adhesives may contain pollutants that can enter the water and soil.
- A cork, a small piece of tile, or something similar
Instructions
- Before gluing the two pots together, the drainage hole in the larger pot must be sealed. A cork or a small piece of tile works well for this. The adhesive provides additional secure closure.
- The smaller pot is then placed on the sealed, larger pot so that the openings of both pots face each other. The small pot sinks slightly into the larger one.
- Then, the joint between the two pots is sealed. This is done either by pouring melted beeswax into the seam with a spoon or by following the instructions for another adhesive. It is important that the pots are connected without gaps.
- After the adhesive dries, check to ensure the Olla is truly sealed.
Also interesting: What is a Drip Hose and How Is It Used?
Burying and Filling Ollas
Once it is ensured that the Olla is sealed, it can be put to use. It is best to place the irrigation aid in the ground before planting or sowing, as there is otherwise a risk of damaging roots or disturbing the sowing. The Olla is buried so that the upper edge protrudes about three to five centimeters from the soil. The vessel is then filled through the top hole. To prevent the water from evaporating quickly and to keep soil, plant parts, or small animals from falling into the Olla, it should be covered. Flat stones or a saucer work well for this.